ICE-PIC FAQ
This page pertains to ICE-PIC cards and not to ICEPODs. Although functionally similar, they are not the same.
Very Important Disclaimer: Under no circumstances should anyone attempt to reflash an ICEPOD—this may result in rendering the unit unusable and unrecoverable!! They are configured to work correctly prior to shipping and do not require end-user modification.
Contents
- 1 Disclaimers
- 2 Software
- 2.1 How do I load a new version of the ICE Option Tree in Linux?
- 2.2 What version of the ICE Option Tree can I use with the ICE-PIC5XL, and how do I flash the card with the new version?
- 2.3 What version of the ICE Option Tree can I use with the ICE-PIC6, and how do I flash the card with a new version?
- 2.4 Can I do independent decimation with an ICE card?
- 2.5 How can I check my PIC5XL or PIC6 for non-baseline data?
- 3 Hardware
- 3.1 What is the maximum rate for an E2D?
- 3.2 How many I/O modules can be installed on a PIC4T, PIC4X, or PIC5XL?
- 3.3 Why won't my card reset?
- 3.4 Which I/O modules are available for the ICE-PIC5XL or PIC6?
- 3.5 What do the dip switches/Jumpers on the side of the card do?
- 3.6 What is the recommended clock level for an A2D-r7?
- 3.7 What are the connections on the A2D-r7?
- 3.8 What are the technical specifications on the programmable clock on the ICE-PIC4T?
- 3.9 What are the clocking options on the SlimPIC-a?
- 4 ICE-PIC Configuration on RHEL/CentOS 7
Disclaimers
Before proceeding with this document, please be advised of the following disclaimers:
Software
How do I load a new version of the ICE Option Tree in Linux?
Download the current version of the ICE option tree from this website's software downloads page. Use the latest version in the stable directory. In this example we will use ice398-22.
As iceman, copy the ZIP file into the packages directory:
cd /opt/ice/pkg
cp /<source>/ice398-22.zip .
unzip ice398-22.zip
Remove the existing icexxx link and add a link to the new version of the option tree:
rm icexxx
ln -s ice398-22 icexxx
Verify the updated link:
ls -l
icexxx -> ice398-22
Start NeXtMidas and run the installer to update to the new option tree
nms
ice reinstall
For X-Midas users
Start X-Midas and type
xms
Then type
xm
Once in a X-Midas shell, type
xm opt ice [filename]  # The current version you just established
xmpath ice
xmbopt
This will rebuild the option tree using the version you just established.
What version of the ICE Option Tree can I use with the ICE-PIC5XL, and how do I flash the card with the new version?
The ICE-PIC5XL is in production, and a few select customers have been using the card for over a year now. Some of the card's capabilities are still being developed, and the card will only work with version 318 (or higher) of the ICE Option Tree available from this website.
When you receive a PIC5XL it will be flashed with the most current version of the ICE option tree. If a new release of the option tree is posted and you would like to upgrade to this new version you will need to reflash your PIC5XL with the new version. To do so please follow the following steps:
Step 1: Set the JTAG Jumper
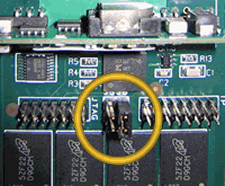
Make sure the jtag jumper is in the J6 position. This allows the card to be flashed with the new version of the ICE option tree from the PCI bus.
Note: when the jumper is in this position the card is capable of storing classified data. To check the card for non-baseline data please refer to questions 4.
Step 2: Copy the ICE Option Tree
Load the new version of the ICE option tree on to your platform, and point the icexxx link to this new version.
Step 3: Detect the PIC Card
When using NeXtMidas and/or X-Midas enter a shell. From the prompt you will want to type
pic detect
This will tell you a couple of pieces of information. First it should tell you the PIC card is being detected in your platform. For example, the first line displayed should read as follows:
CARD #0 Type=PIC5
(If it does not display this or just returns you to the prompt then the card is not being detected and other troubleshooting needs to take place first)
The other piece of information pic detect will tell you that is important is in the last line. Which should read something like this:
Firmware Proc=318 IOC=00 SoC Ver=318 Sig=SS
Module Signatures
The important part of this line is the Sig=. Sig stands for signature and there are three versions (SS, HH, SH) based on what I/O modules you are using:
| Signature | Module(s) |
|---|---|
| SS | Low speed modules (E2Ds, D2Es, A2D-r8s, and D2A-r8s) |
| HH | High speed modules (UDP-CPR, SONETs, A2D-r9s, and D2A-r9s) |
| SH | This is for when you have a low speed and a high speed module on the same card |
This is important to verify because when you reflash the card you will want to flash it with the correct signature, so please remember this before proceeding to step 4.
Step 4: Flash the Card
Once you have verified the card is being detected by the platform and you know the card signature you can now flash the card. To do this, type
picd loadflash pic1 icepic5_xx
Keep in mind that pic1 is a generic card alias. If you have given your card a different alias you will need to substitute it in for pic1. Also, where I have put xx in this line you will need to put in whatever signature (SS, HH, or SH) you discovered the card originally had when you did pic detect in step 3. You will be asked if you want to proceed, and if you do please type Y and hit return. The load usually takes 3-4 minutes.
Please note: For NeXtMidas users, once you say yes to the load there will be a series of dots that scroll across your screen as the load takes place. For X-Midas users there is NOT a series of dots and the prompt will just sit there while the load is taking place. This usually take 2-3 minutes. After the load finishes it will return you to the X-Midas prompt.
Every once in a while the card will detect and error with the load, and this will be signified with a lower case r. Usually followed by an upper case R that it was corrected. If this happens the system can also get confused and could start scrolling a bunch or rrrrrrrrrs. If this happens you can Control-C out of the loadflash, then up arrow and repeat the loadflash command and all should be good.
Step 5: Check for Errors
Very Important: Once the flash has finished please verify that the flash loaded with zero errors.
If you did get errors, do not power down the system, you will need to repeat the loadflash command and loadflash the card until it comes back with zero errors.
If there are zero errors you will need to power down your unit completely, and then power it back up for the new flash to take.
What version of the ICE Option Tree can I use with the ICE-PIC6, and how do I flash the card with a new version?
The ICE-PIC6 is in production, and a few select customers have been using the card since the beginning of 2008. Some of the card's capabilities are still being developed, and the card will only work with an ICE320 (or higher) version of the option tree available from this website. When you receive a PIC6 it will be flashed with the most current version of the ICE option tree. If a new release of the option tree is posted and you would like to upgrade to this newer version, you will need to reflash your PIC6 with the new version. To do so please follow these steps:
Step 1: Set the JTAG Jumper
Make sure the jtag jumper is in the right hand position (As seen below). This allows the card to be reflashed with the new version of the ICE option tree. (Please note, when the jumper is in this position the card is capable of storing classified data. To check the card for non-baseline data please refer to questions 4)
Step 2: Copy the ICE Option Tree
Load the new version of the ICE Option Tree on to your platform, and point the icexxx link to this new version. (Make sure to build the Option Tree)
Step 3: Detect the PIC Card
When using NeXtMidas and/or X-Midas enter a shell. From the prompt you will want to type
pic detect
This will tell you a couple of pieces of information. First, it should tell you the PIC card is being detected in your platform. For example, the first line displayed should read as follows:
CARD #0 Type=PIC6
(If it does not display this or just returns you to the prompt, then the card is not being detected and other troubleshooting needs to take place first.)
The other piece of information pic detect will tell you that is important is in the last line. Which should read something like this:
Firmware Proc=320 IOC=00 SoC Ver=320 Sig=SS
Module Signatures
The important part of this line is the Sig=. Sig stands for signature, and there are a few versions (SS, HH, SH, DD, HHN) based on what I/O modules you are using.
| Signature | Module(s) |
|---|---|
| SS | Low-speed modules: E2Ds, D2Es, ICE-A2D-r8, and D2A-r8 |
| HH | Hypertransport: UDP-CPR, SONETs, ICE-D2A-r9, and ICE-A2D-r13 |
| SH | This is for when you have a low speed and a high speed module on the same card |
| DD | Double Data rate: DR2D or ICE-A2D-m14 |
| HHN | This is for use with the A2D-r11 |
This is important to verify, because when you reflash the card, you will want to flash it with the correct signature, so please remember this before proceeding to step 4.
Step 4: Flash the Card
Once you have verified the card is being detected by the platform and you know the card signature, you can now flash the card. To do this, type
picd loadflash pic1 icepic6_xx
Keep in mind that pic1 is a generic card alias. If you have given your card a different alias, you will need to substitute it in for pic1. Also, where I have put xx in this line you will need to put in whatever signature (SS, HH, SH, DD, HHN) you discovered the card originally had when you did pic detect in step 3. You will be asked if you want to proceed, and if you do please type Y and hit return. The load usually takes 2 minutes. Please note - For NeXtMidas users, once you say yes to the load there will be a series of dots that scroll across your screen as the load takes place. For X-Midas users, there is NOT a series of dots and the prompt will just sit there while the load is taking place. After the load finishes it will return you to the X-Midas prompt.
Every once in a while, the card will detect and error with the load, and this will be signified with a lower case r. Usually followed by an upper case R that it was corrected. If this happens the system can also get confused and could start scrolling a bunch or rrrrrrrrrs. If this happens, you can Control-C out of the loadflash, then up arrow and repeat the loadflash command and all should be good.
Step 5: Check for Errors
Very Important: Once the flash has finished, please verify that the flash loaded with zero errors.
If you did get errors, do not power down the system, you will need to repeat the loadflash command and loadflash the card until it comes back with zero errors.
If there are zero errors, you will need to power down your unit completely and then power it back up for the new flash to take.
Can I do independent decimation with an ICE card?
Yes, but to do independent decimation you need to add the ITDEC flag to your hardware config file. When using this flag you can use all 8 channels on a PIC4T independently, but please keep in mind this is an all or nothing flag.
How can I check my PIC5XL or PIC6 for non-baseline data?
The Series-5 and 6 cards use a reprogrammable Flash to allow field upgrades to the PCI interface. To insure the E-PROM still contains only the baseline code from the ICE factory, the following procedures are provided to read-back the E-PROM contents and calculate its 32-bit CRC. For instance, for the 318 release the baseline CRCs are as follows:
ICE-PIC5_SS = 0x1125a600
ICE-PIC5_HH = 0x7b431d74
ICE-PIC5_SH = 0x69d3f94e
ICE-PIC5_SSR = 0x3f03634c
ICE-PIC5_HHR = 0x08a4e708
For future releases make sure to check the current release notes for the current CRCs.
NeXtMidas or X-Midas
If you are using NeXtMidas or X-Midas please follow these steps:
Type
picd checkflash <card name>
This will run the checkflash on the e-prom and the result will be a CRC. Please check the CRC with the CRCs provided with the current release notes.
- If they match then the e-prom does not have any non-baseline data stored on it.
- If it is different then there is non-baseline data stored on the e-prom.
- If you would like to clear this data for security purposes please reflash the card. (See question 2)
Other
If you are not using NeXtMidas or X-Midas please follow these steps:
Make sure the test program file has been built completely. Please see the ICEROOT/test/readme.txt file
Type
pic detect
This will tell you the number-based index of the cards in the system: even though you might call your card pic1 in NeXtMidas or X-Midas, it might be in slot 0 of the computer identified in the system BIOS, which means the number for the card is 0.
Then type
$ICEROOT/test/test pic# checkflash
where # is the card number identified during pic detect.
This will run the checkflash and provide you with a CRC to check with the baseline CRCs listed above. Again, if they match then the e-prom does not have any non-baseline data stored on it. If it is different then there is non-baseline data stored on the e-prom. If you would like to clear this data for security purposes please reflash the card. (See question 1.2)
Hardware
What is the maximum rate for an E2D?
100mhz
How many I/O modules can be installed on a PIC4T, PIC4X, or PIC5XL?
Each card can be populated with up to two I/O modules. In addition to the I/O modules the PIC4X can be populated with up to one processor module, and the PIC5XL can be populated with up to two processor modules.
Why won't my card reset?
If your card won't reset, there is a chance you have a card that has not been upgraded with a particular diode. There were a series of PIC4T, PIC4X/MBT4 cards shipped to our customers we later discovered had a SHARC/PPC anomaly. Since this has been discovered, every board shipped from ICE has been marked to signify it is good or has been upgraded. Symptoms of the anomaly are the board failing PIC TEST, or not being able to reset the board.
You can tell if your board does NOT have the anomaly, or if it has been upgraded by two markings on the board. The first marking is easily identified if your board is removed from the system. If the rev number of the board is colored red, then the board is up to date and does not have the anomaly. The second location is easily located if the board is still installed in a system. Locate the PCI plate, which should be viewable from the back of your system. The top screw on the PCI plate should be colored red signifying the board is good.
Which I/O modules are available for the ICE-PIC5XL or PIC6?
As of 04/17/09 the following modules are in production and available for the PIC5XL or PIC6:
ICE-A2D-r8, ICE-A2D-r13, ICE-D2A-r9, ICE-SONET-r4, ICE-SONET-r5, ICE-E2D-r5, ICE-D2E-r5, ICE-UDP-r5-CPR and FBR
ICE-DR2D, ICE-A2D-r11, ICE-LV2D-r5, ICE-D2LV-r5
For a complete current list, please refer to the I/O Modules page.
What do the dip switches/Jumpers on the side of the card do?
Early ICE-PIC Cards
On some early (PIC3 or earlier) models the dip switches are just jumpers. To synchronize acquisition/playback between multiple cards, J2 must be in place (closed) for both the master and slaves. The Master asserts the XSOE flags to drive the line. The J1 terminators should be open. Add J3 for 2.5V 10kohm pull-up/dn and diode protection on the input/output. One onboard crystal X2 is socketed for an optional user supplied reference clock. This clock can be used for driving A2D or D2E modules at fixed rates or for special IOC code rates. By default, X2 is a 100MHz clock for maximum bandwidth A2DR7 clocking.
ICE-PIC4T, ICE-PIC4X, and ICE-PIC5XL
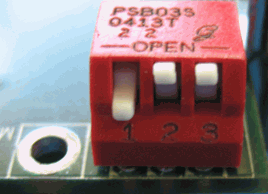
The edge connector has 1 SMB connector to provide an external clock for output modules or a signal for synchronizing multiple cards. There are 3 dip switches for configuring the external clock/sync connector:
- J1 – Factory Closed for on board 50 ohm termination; Open for high impedance
- J2 – Factory Open for clock; Closed for multi-board signaling (external sync),
- J3 – Factory Open for AC-coupled 1Vpp sinusoid clock; Closed for DC-coupled LVTTL clock,
ICE-PIC6
The edge connector has 1 SMB connector to provide an external clock for output modules or a signal for synchronizing multiple cards. There are 4 dip switches for configuring the external clock/sync connector:
- J1 – Factory Closed/On for onboard 50 ohm termination; Open/Off for high impedance
- J2 – Factory Open/Off for clock or trigger input; Closed/On for master trigger output signaling (External Trigger Source)
- J3 – Factory Closed/On for DC-coupled LVTTL clock or trigger; Open/Off for AC-coupled sinusoidal clock input
- J4 – Factory Open/Off – Switch Reserved
ICE-PIC7
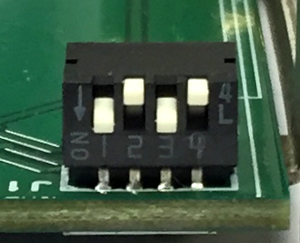
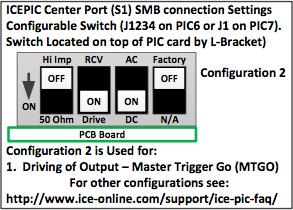
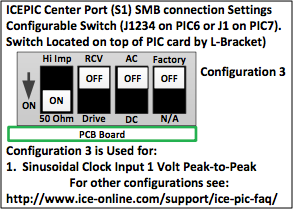
There are 4 dip switches located on the top of the card near the L-Bracket. Various configured settings are used depending on the user's application. For the switch to be ON (also designated Closed) is with the switch baton toward the board. In the graphic to the right an arrow indicates the ON position.
- J1 – Factory Closed/On for onboard 50 ohm termination; Open/Off for high impedance
- When J1 is Open, J2 is Closed
- When J2 is Closed, J1 is Open
- J2 – Factory Open/Off for clock or trigger input; Closed/On for master trigger output signaling (External Trigger Source)
- When J2 is Closed, J1 must be Open
- When J2 is Open, J1 must be Closed
- J3 – Factory Closed/On for DC-coupled LVTTL clock or trigger; Open/Off for AC-coupled sinusoidal clock input
- When sinusoidal input is used (J3 Open), J1 must also be Open for high impedance
- When LVTTL trigger/clock input is used (J3 is Closed), J1 must also be Closed for 50 ohm termination
- J4 – Factory Open/Off – Switch Reserved
Example Configurations for All Recommended ICE-PIC6 and ICE-PIC7 Scenarios

|
|
|
What is the recommended clock level for an A2D-r7?
1Vp-p, 3 dBm
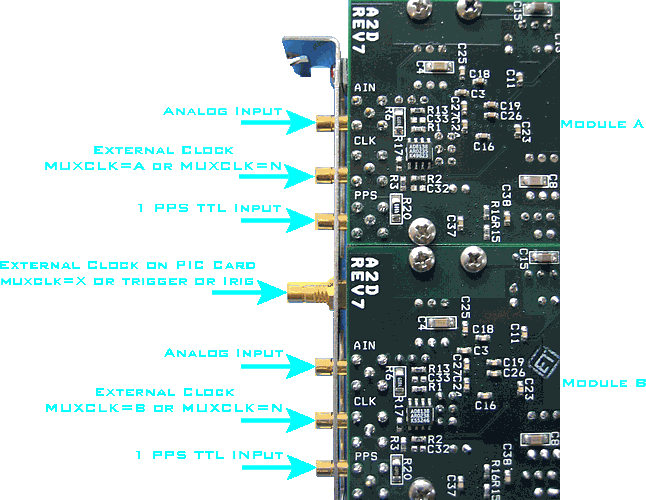
What are the connections on the A2D-r7?
Two A2D-r7s on a PIC Card:
What are the technical specifications on the programmable clock on the ICE-PIC4T?
The programmable clock on the ICE-PIC4T can be used from 100KHz -105MHz. It will settle to within 1000ppm of the desired rate.
What are the clocking options on the SlimPIC-a?
C-clock = 64MHz, I-Clock = 40MHz, and an external clock. (Both C and I are accurate within 100 ppm) If you use an external clock please keep in mind it must be a square wave between 0 - 3.3v.
Warning: Anything over 3.3v could ruin the front end of the card since there is no comparator on board. The input impedance is 50 ohm.
ICE-PIC Configuration on RHEL/CentOS 7
- For more on configuring the memory and kernel line for ICE-PIC cards, please see ICE-PIC Configuration.
The following kernel line options are recommended with RHEL/CentOS 7 running on Intel x86_64 processors:
... elevator=deadline idle=poll processor.max_cstate=0 intel_idle.max_cstate=1 intel_pstate=disable
Memory must also be allocated for the ICE buffer. Please note that the '$' must be escaped with '\' under RHEL 7):
memmap=<icedisk+mappable>M\$<start>M ice.rs=<start>M ice.rd=<icedisk>M ice.rm=<mappable>M
So an example might be the following:
memmap=10048M\$4096M ice.rs=4096M ice.rd=10000M ice.rm=48M
