Config
This document details how to install the ICE Toolkit software and NeXtMidas for the operation of ICE-PIC6/7/8 series DSP cards on RHEL/CentOS 6/7/8, including required system configuration.
Note: Many configurations are possible and the installation may need to be tailored to fit your specific needs. This guide aims to cover the vast majority of use cases.
Contents
- 1 Prerequisites
- 2 ICE Operating User
- 3 Directory Structure
- 4 Download Software
- 5 Temporary Files Directory
- 6 Configuration Files
- 7 Compile the Software
- 8 Build and Install the ICE-PIC Driver
- 9 Kernel Options for Optimization
- 10 Configure Memory Allocation
- 11 Test the ICE-PIC Card(s)
- 12 Flashing the Firmware on an ICE-PIC Card
- 13 DIP Switches
Prerequisites
As root, install prerequisite packages:
- gcc
- gcc-c++
- glibc-devel
- libstdc++-devel
- kernel-headers
- kernel-devel
- tcsh
You will also need a Java Development Kit (JDK). We recommend downloading the Oracle JDK for your distribution, usually as a tar.gz file, either version 1.7 or 1.8.
ICE Operating User
Create ICE operating user 'iceman':
useradd iceman
passwd iceman
<enter password>
Change iceman's shell to TC-Shell:
usermod -s /bin/tcsh iceman
Directory Structure
Create the following directory structure:
/
|-- ...
|-- mnt
|   |-- data01
|   |-- data11
|   |-- icedisk
|   `-- ramdisk
|-- opt
|   `-- ice
|   |   |-- aux
|   |   |   |-- data01 -> /mnt/data01
|   |   |   |-- data11 -> /mnt/data11
|   |   |   |-- icedisk -> /mnt/icedisk
|   |   |   `-- ramdisk -> /mnt/ramdisk
|   |   |-- pkg
|-- ...
Note that /opt/ice/aux contains only symbolic links. This is a matter of convenience so that all of the AUXes can be referenced from within the ICE tree. They can be create as such:
cd /opt/ice/aux
ln -s /mnt/data01 data01
ln -s /mnt/data11 data11
ln -s /mnt/icedisk icedisk
ln -s /mnt/ramdisk ramdisk
The entire /opt/ice directory should be owned by iceman, as well as /mnt/icedisk:
chown -R iceman:iceman /opt/ice /mnt/icedisk
AUXes and Data Volumes
The RamDisk AUX should be a tmpfs, which can be created in /etc/fstab with the following entry:
tmpfs /mnt/ramdisk tmpfs size=2048M,nr_inodes=16k,mode=777,user 0 0
Data01 should be on a separate partition, although it is not required.
Data11 may be a high-speed data volume, such as a RAID0 of SSDs, but may also be a high-capacity RAID5/6 volume, depending on the speed required for capture or playback and disk redundancy consideration.
Download Software
Download the latest stable ICE tree and NeXtMidas release from https://wiki.ice-online.com/Downloads/stable
Copy the ICE tree software ZIP archive, the NeXtMidas ZIP archive, and the JDK archive into /opt/ice/pkg and make sure they are owned by iceman:
cp <source path>/ice398-48.zip /opt/ice/pkg
cp <source path>/nxm371-04.zip /opt/ice/pkg
cp <source path>jdk1.8.tar.gz /opt/ice/pkg
chown iceman:iceman /opt/ice/pkg/*
Now switch users to iceman:
su - iceman
Dearchive the software packages and make symbolic links, which makes the paths more manageable and later software upgrades considerably easier:
cd /opt/ice/pkg

unzip ice398-48.zip
unzip nxm371-04.zip
tar -xzf jdk1.8.tar.gz

ln -s ice398-48 icexxx
ln -s nxm371-04 nmxxx
ln -s jdk1.8 jdk
Temporary Files Directory
As iceman, create directory for temporary NeXtMidas files:
mkdir ~/tmp
Configuration Files
Modify /opt/ice/pkg/nmxxx/nxm/sys/cfg/nmstartup.mm to include the following (use this as a complete example):
!!!!!!!!!!!!!!!!!!!!!!!!!!!!!!!!!!!!!!!!!!!!!!!!!!!!!!!!!!!!!!!!!!!!!!!!!
! Macro to initialize system specific settings.
! @author Jeff Schoen
! @version $Id: nmstartup.mm,v 1.37 2011/11/10 20:58:41 ntn Exp $
!!!!!!!!!!!!!!!!!!!!!!!!!!!!!!!!!!!!!!!!!!!!!!!!!!!!!!!!!!!!!!!!!!!!!!!!!
startmacro

info "DEPRECATION warnings ON, to turn off edit nmstartup.mm in SYS->CFG"
debug on DEPRECATE

! portable way to define normal auxes (1 = /opt/ice/aux/data01/+/, etc.)
file name u:aux.1  (opt,ice,aux,data01,+)
file name u:aux.2  (opt,ice,aux,ramdisk)
file name u:aux.11 (opt,ice,aux,data11,+)

! define OS specific AUXes
if env.ostype eqs "UNIX"
  sedit AUX.9 AUX.9 append ",RAM,AUTO"
! sedit AUX.9 AUX.9 append ",RAM,<start>M,<sized>M"
elseif env.ostype eqs "DOS"
  sedit AUX.9 AUX.9 append ",RAM,<start>M,<sized>M"
elseif env.ostype eqs "VMS"
  ! nothing specific for VMS
endif

! set write AUX and read AUX list
aux 1 1 cwd dat ram

path set dsp hwc

env set "HWFILE" "nxm.sys.dat.hwconfig"
res t:km "nxm.sys.cfg.keyMap.tbl"
env set KEYMAP ^km

endmacro
Create the following NeXtMidas macro /home/iceman/nmstartup.mm
startmacro

option ice /opt/ice/pkg/icexxx
path set ice,dsp,hwc,sys,ucl
if "/proc/driver/icepic" fexists then
  pic aux 9
endif
hw file nxm.ice.dat.hwconfig
aux 1 1|2|9|DAT|11|CWD|RAM|HOME

endmacro
Add the following lines to /home/iceman/.cshrc, creating the file if it does not already
exist:
#!/bin/csh
#
# Red-Hat System csh.cshrc
if ( -f /etc/csh.cshrc ) source /etc/csh.cshrc
#
# Set environment variables
if ( "${?HOMEDIR}" == 0 ) then
  setenv HOMEDIR /home/iceman
endif
if ( "${?TMPDIR}" == 0 ) then
  setenv TMPDIR $HOMEDIR/tmp
endif
if ( "${?USERPATH}" == 0 ) then
  setenv USERPATH /bin:/sbin:/usr/bin:/usr/sbin:${HOMEDIR}/bin
  setenv PATH ${PATH}:${USERPATH}
endif
if ( "${?ICEPKG}" == 0 ) then
  if ( -e /opt/ice/pkg ) then
    setenv ICEPKG  /opt/ice/pkg
    setenv ICEROOT $ICEPKG/icexxx
    setenv NMROOT  $ICEPKG/nmxxx
    setenv NM_USER_JVM_FLAGS "-Xmx1024m -Xms1024m"
    setenv NMHISTORY_DIR $TMPDIR
    setenv JAVAHOME $ICEPKG/jdk
    if ( -e $JAVAHOME/bin ) then
      setenv PATH ${PATH}:$JAVAHOME/bin
    endif
    if ( -e $JAVAHOME/jre/bin ) then
      setenv PATH ${PATH}:$JAVAHOME/jre/bin
    endif
    if ( -e /opt/ice/bin ) then
      setenv PATH ${PATH}:/opt/ice/bin
    endif
  endif
endif
#
# Set C-Shell/TCSH environment
if ( "${?LINES}" == 0 ) then
  setenv LINES
endif
if ( "${?COLUMNS}" == 0 ) then
  setenv COLUMNS
endif
#
# Aliases
alias ice      ${ICEROOT}/jre/ice
alias nms      source ${NMROOT}/os/unix/nmstart
alias nmstart  source ${NMROOT}/os/unix/nmstart
Now load the environment from the .cshrc file, either logout and log back in as iceman, or
source ~/.cshrc
Compile the Software
Compile NeXtMidas and the ICE tree:
nms
nm make all
nm make all ice
nmend
Try starting NeXtMidas and test the configuration:
nms
nm
nM> plot apenny
If a window with a penny appears, NeXtMidas is working correctly.
Also check to make sure that all AUXes are configured properly:
nM> aux
Write AUX     = 1 (overwrite existing files, where applicable)
Read AUX List = 1|2|9|11|DAT|CWD|RAM|HOME

CWD           = /root/                                             <Type=File>
HOME          = /root/                                             <Type=File>
HOMEPATH      = /root/                                             <Type=File>
DAT           = /opt/ice/pkg/nmxxx/nxm/sys/dat/                    <Type=File>
RAM           = ram:                                               <Type=Ram>
1             = /opt/ice/aux/data01/+/                             <Type=File>
2             = /opt/ice/aux/ramdisk/                              <Type=File>
11            = /opt/ice/aux/data11/+/                             <Type=File>
9             = ramd:/opt/ice/aux/icedisk/,RAM,6144M,8000M,        <Type=RamDisk>
nM> files
Auxiliary [1] = /opt/ice/aux/data01/iceman/   (0 files)
Auxiliary [2] = /opt/ice/aux/ramdisk/   (0 files)
Auxiliary [9] = ramd:/opt/ice/aux/icedisk/   (0 files)
Auxiliary [11] = /opt/ice/aux/data11/iceman/   (0 files)
Auxiliary [DAT] = /opt/ice/pkg/nmxxx/nxm/sys/dat/   (31 files)
...
Auxiliary [CWD] = /home/iceman/   (2 files)
...
Auxiliary [RAM] = ram:   (0 files)
Auxiliary [HOME] = /home/iceman/ matches Auxiliary [CWD] (skipping)
You should see all the AUXes as configured in the sys/cfg/nmstartup.mm and none should say "not a directory". If something is missing, check to make sure that all the directories and/or symlinks listed here actually exist.
Build and Install the ICE-PIC Driver
As root,
cd /opt/ice/pkg/icexxx/drv/lnx
./icepic make
./icepic install
./icepic start
Note: If you are upgrading the driver from a previous version, first stop and remove the old driver:
./icepic stop
./icepic remove
Kernel Options for Optimization
The following kernel line options are recommended with RHEL/CentOS 6/7/8 running on Intel x86_64 processors:
... elevator=deadline idle=poll processor.max_cstate=0 intel_idle.max_cstate=1 intel_pstate=disable
These optimizations prevent the CPU from entering deep c-states or imposing other performance constraints.
Configure Memory Allocation
There are three memory options to consider:
| RamDisk | The size of the circular memory buffer for main ICE-PIC I/O |
|---|---|
| RamStart | The start point for the memory buffer |
| RamMapped | Amount of memory used for self-tests and available for custom applications |
Determine the last usable block of memory:
dmesg | grep e820
 ...
 BIOS-e820: 0000000100000000 - 000000042fe80000 (usable)
Converting these values from hexadecimal to decimal, we obtain:
Start:
0x0000000100000000 = 4294967296 (4096M)
Top of Memory (ToM):
0x000000042fe80000 = 17983602688 (17150M)
Maximizing the RamDisk
In order to maximize the size of the memory buffer, use these values in calculating RamStart, RamDisk, and RamMapped. For example, if we want a RamDisk of 8000MB and RamMapped value of 64MB, the calculation would be as follows:
RamStart = 4096M
RamMapped = 64M
RamDisk = ToM - ( RamStart + RamMapped ) => 17150M - ( 4096M + 64M ) = 12990M
Memory Allocation Method
This memory can be allocated using two mechanisms: kernel allocated memory (recommended) and manually mapped memory. Whereas manually allocating memory requires the RamStart parameter to be explicitly specified, kernel allocated memory allows the kernel to handle where in memory the RamDisk buffer is placed.
It is not necessary to maximize the size of the RamDisk: often the remainder of the RAM may be required by the system for I/O or other applications.
RHEL/CentOS 6
Kernel Allocated Memory
Configure the kernel line parameters in /boot/grub/grub.conf:
...
kernel ... ice.ra=2 ice.rd=8000M ice.rm=64M
Manually Mapped Memory
memmap=<icedisk+mappable>M$<start>M ice.rs=<start>M ice.rd=<icedisk>M ice.rm=<mappable>M
For example,
memmap=8064M$6144M ice.rs=6144M ice.rd=8000M ice.rm=64M
RHEL/CentOS 7/8
Kernel Allocated Memory
Configure the kernel line parameters in /etc/default/grub:
...
GRUB_CMDLINE_LINUX="... ice.ra=2 ice.rd=8000M ice.rm=64M"
Manually Mapped Memory
Please note that the '$' must be escaped with '\' under RHEL 7/8):
memmap=<icedisk+mappable>M\$<start>M ice.rs=<start>M ice.rd=<icedisk>M ice.rm=<mappable>M
Additionally, if these options are set in /etc/default/grub (recommended), the '\' and '$' themselves must be escaped, so an example might be the following:
memmap=8064M\\\$6144M ice.rs=6144M ice.rd=8000M ice.rm=64M
Remake GRUB2 Configuration
On Legacy/BIOS systems:
grub2-mkconfig -o /boot/grub2/grub.cfg
On UEFI systems:
grub2-mkconfig -o /boot/efi/EFI/redhat/grub.cfg
Verify Configuration
Reboot the machine.
Check that the driver loaded and verify that the requested memory buffer size was obtained:
cat /proc/driver/icepic
You should see:
RamStart  : XXXX Mby
RamDisk   : 8000 Mby
RamMapped : 64 Mby
...
where XXXX is the RAM buffer start address in decimal.
Test the ICE-PIC Card(s)
Login as iceman.
Start NeXtMidas and enter the shell:
nms
nm
From within the NeXtMidas shell, detect any ICE-PIC cards that might be installed:
nM> pic detect
Note the PCI-e width and generation.
Reset each ICE-PIC card:
nM> pic reset pic1
If you have a graphical environment,
nM> pic test/spec pic1 /swamp /pcidbg
In a text-only environment,
nM> pic test pic1
Flashing the Firmware on an ICE-PIC Card
Set the JTAG Jumper
In order to flash a new firmware load on an ICE-PIC card, the JTAG jumper must be placed over pins 2-3 (see Figure 1.1).
(Make sure to place the jumper back to its original position over pins 1-2 when flashing is complete.)
Choose the Firmware Signature
If it becomes necessary to flash the firmware on the PIC card, you must first choose the correct firmware load signature. When in doubt, use HH, as this is the more broadly applicable.
Module Signatures
From pic detect, note the Sig= value. Sig stands for signature, and there are several versions (SS, HH, SH, DD, etc.) from which to choose, depending on what DSP card and I/O modules you are using.
| Signature | Module(s) |
|---|---|
| SS | Low-speed modules: E2Ds, D2Es, ICE-A2D-r8, and D2A-r8 |
| HH | Hypertransport: UDP-CPR, SONETs, ICE-D2A-r9, and ICE-A2D-r13 |
| SH | This is for when you have a low speed and a high speed module on the same card |
| DD | Double Data rate: ICE-DR2D-r5 or ICE-A2D-m14 (Note: current ice398-XX releases use HH for ICE-A2D-m14) |
| HHN | This is for use with the ICE-A2D-r11 |
| HHX | PCI-e Gen3 speed for ICE-PIC8 with high-speed input modules, such as ICE-A2D-M20 |
| HHX2 | PCI-e Gen3 speed for ICE-PIC8 with dual high-speed output modules, such as ICE-D2AWG-M3 |
Loadflash Procedure
Once you begin flashing the ICE-PIC card, do not interrupt the process, as this can 'brick' the card and rendering it unusable. A card in this state must be reset at the factory.
Note: Be especially careful to choose the correct version of the firmware for the series of your ICE-PIC card, e.g., ICE-PIC6, ICE-PIC7, ICE-PIC8, etc.
For an ICE-PIC8 with HH:
nM> picd loadflash pic1 icepic8_hh
Should you encounter errors, which may be indicated by RrrRrr... output, simply executed the loadflash command again.
Power Cycle and Verify
Once the loadflash has completed, power off the machine and remove power for 5-10 seconds before booting back up.
After power cycling, start NeXtMidas, enter the shell, and verify that the flash was successful:
nms
nm
nM> pic reset
nM> pic detect
The card should now reset without issue, and the Sig should reflect the signature chosen in the previous step. The SoC should also be the same version as your software.
To verify the flash, use the checkflash command and compare the CRCs:
nM> pic checkflash pic1 icepic8_hh
DIP Switches
On the ICE-PIC6 and ICE-PIC7, there is a set of four DIP switches that control various features of the DSP card.
ICE-PIC6
The edge connector has 1 SMB connector to provide an external clock for output modules or a signal for synchronizing multiple cards. There are 4 DIP switches for configuring the external clock/sync connector:
- J1 – Factory Closed/On for onboard 50 ohm termination; Open/Off for high impedance
- J2 – Factory Open/Off for clock or trigger input; Closed/On for master trigger output signaling (External Trigger Source)
- J3 – Factory Closed/On for DC-coupled LVTTL clock or trigger; Open/Off for AC-coupled sinusoidal clock input
- J4 – Factory Open/Off – Switch Reserved
ICE-PIC7
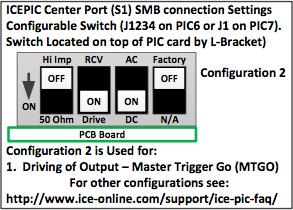
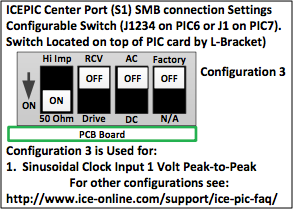
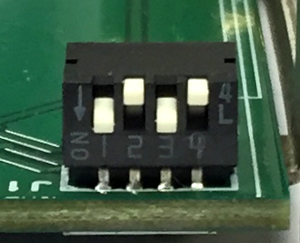
There are 4 DIP switches located on the top of the card near the L-Bracket. Various configured settings are used depending on the user's application. For the switch to be ON (also designated Closed) is with the switch baton toward the board. In the graphic to the right an arrow indicates the ON position.
- J1 – Factory Closed/On for onboard 50 ohm termination; Open/Off for high impedance
- When J1 is Open, J2 is Closed
- When J2 is Closed, J1 is Open
- J2 – Factory Open/Off for clock or trigger input; Closed/On for master trigger output signaling (External Trigger Source)
- When J2 is Closed, J1 must be Open
- When J2 is Open, J1 must be Closed
- J3 – Factory Closed/On for DC-coupled LVTTL clock or trigger; Open/Off for AC-coupled sinusoidal clock input
- When sinusoidal input is used (J3 Open), J1 must also be Open for high impedance
- When LVTTL trigger/clock input is used (J3 is Closed), J1 must also be Closed for 50 ohm termination
- J4 – Factory Open/Off – Switch Reserved
Example Configurations
The following are example configurations for all recommended ICE-PIC6 and ICE-PIC7 scenarios:

|

|

|

